

Embroider yourself a llama because why not?
I decided to up-cycle another one of my sweaters into a handbag but I wanted to add something special to it. Since I like llamas very much, I didn’t need to think too long about what to embroider. This project turned out to be a lot of fun, therefore, I’ll share it with you and who knows, maybe you get inspired by my embroidered llama! If you’d like to see another embroidery I made, check out my tutorial on Amish Stumpwork.

Table of Contents
Supplies:
- embroidery ring
- fabric to embroider on, like canvas
- embroidery threads (I used the colors cream, orange, red, turquoise and black)
- embroidery needle
- scissors
- pencil
- a piece of paper
- circular stencils
- A happy llama
How to:
Prepare and make the contours


I wanted the embroidery to be attached to the sweater but embroidering directly on it wasn’t an option. I placed the canvas on top of the sweater and then fastened both fabrics in the embroidery ring.
I then sketched the llama on a piece of paper, cut it out and used this stencil to trace it on the canvas. I traced also the face and the saddle.


I started by embroidering the contours of the body without head, legs and saddle. I used split stitch – you can learn more about it here.

This is the finished contour.
Ears, legs, face


I went on to the ears and legs, I filled those with simple straight stitches “there and back”.

This was my llama so far.

I embroidered the face features with a black thread, I just photographed it later.
Saddle

I embroidered the saddle with various colors and geometric shapes. Use your imagination and just embroider whatever you want on the saddle.
Body


To fill the body with embroidery I chose circular flower shapes of different sizes. I used a ruler with a circular pattern to make the flowers round. I embroidered from the edge to the center and sometimes the other way round, each has a little different effect.

No need for the flowers to be filled regularly, not even the center needs to be really in the center. Experiment with moving the center closer to the edge, with the size of the flower and even with the thickness of the thread. It looks really good when the flowers are different. I used 16 and 8 threads most of all but there are also a few flowers made with just 6 threads.


I also used just parts of the flowers at the contour.
Rein

The next step was the rein. First, I made one straight stitch for every part of the rein and then I came back in the first hole.

I then wrapped the thread around that straight stitch and put the needle through the second hole.

For the central part of the rein I did the same like when I wanted to make a straight stitch but I left the thread very loose so that I could form a curve.

The lowest part of the rein was a straight stitch again.
Fringe

There was a slight difference between the fringe at the rein and at the saddle. I started with the rein. I cut 8 thick threads of the same length (about 2,5 cm) and then wrapped a longer thread around their center.

Then I directed all the 8 threads down.

I wrapped the longer thread around the rein…

…wrapped one end about half a centimeter under the center of the fringe (where the threads bend) and tied a knot.

One of the ends was sticking out so I just pulled it through the knot.

This is what the fringe looked like before I cut it.

And this is the fringe after I cut them all to be the same length.

Now the fringe at the saddle was made from a smaller amount of threads and it was slightly thinner. Instead of wrapping a thread at the middle I sew the middle of the threads to the saddle. Then I cut another piece of thread, wrapped it about half a centimeter under the point where the threads bend, tied a know and pulled the ends through the knot. I cut the fringe to be all the same length.
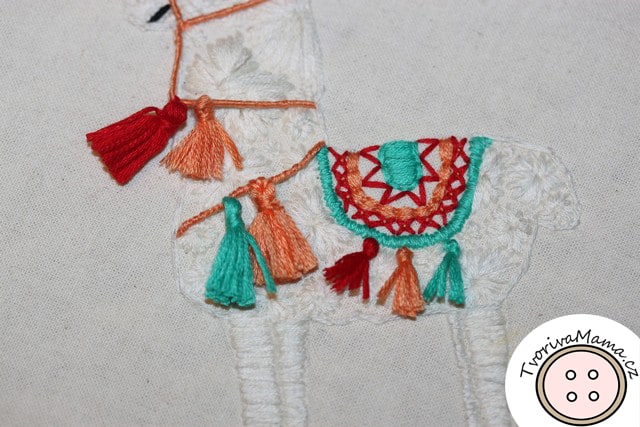
Fringe done

Llama done!


My llama was attached to the sweater and the last thing left to do was to cut it out carefully.
What happened to the sweater then will be the topic of another post 😉
Want more embroidery? You might like my tutorial on how to do Amish stumpwork:


